Deploy those ZENworks App Bundles - MSI edition!
- CISteksTG

- Jul 6, 2020
- 5 min read
Updated: Sep 1, 2023
July 2020


Deploying software with ZENworks Configuration Management has always been easy but there are some cool deployment actions within the platform that can become useful to know about.
Know your app!
Many times, admins are in a rush and may every once in a while, miss important steps in application deployment for a myriad of reasons. Understanding all the nuances of applications as well as required configurations, typically can be obtained from the product documentation & user forums or just searching online for that particular app. We always preach “know your app” in efforts to expose all the options built-in to the application’s installation wrapper whether it’s an EXE or an MSI package.
In this example we are doing to deploy the now infamous ZOOM app (as least as of this writing). I was able to download an MSI file package from their site under the “Download for IT Admin” section – which is pretty cool of them to think of us! https://zoom.us/download
(Side note) This article covers all the available deployment options within the package but most importantly, the command line options or package switches! https://support.zoom.us/hc/en-us/articles/201362163-Mass-Installation-and-Configuration-for-Windows
Here we go
One of the first things we advise after checking in with the documentation or other related material is to simply take your installer and drag it into your Windows command prompt (Admin). At this point we want to expose the available switches by either adding a “/?” or “-?” after the installer. Since this is an MSI wrapped installer, the Windows Installer switch description panel pops-up with a list of available commands (reference image below).

At this point we now test launching the package within the command line so that we can customize the flow of the installation to our liking and understand what will be needed for further customization.
Since MSI packages are processed with the Windows Installer engine, we will test a couple of methods until we like the end result of the final installation run. Here we’ve decided to test run with the “passive” switch because, we like the idea of showing users a status screen especially if they end up installing these applications in the ZAPP self-service window. I mean really - they clicked it so they should see what’s going on so don’t try to run everything hidden!
Yes, I know, there will be times where you’ll just need to push out those apps, patches, scripts or tasks that require some stealthiness but in this example, we’re rolling with passive mode. *Side note, you could setup the ZEN bundle to run silent but show a ZEN installer status screen.
msiexec /i "c:\Temp\Bundles\Apps\ZoomInstallerFull.msi" /passiveYou’ll notice now in this test installation process that it will give us the desired progress bar but additionally, “passive mode” will not display any cancel or close buttons which is pretty cool!

We’re on to ZCC.. Great, at this point we are simply creating a new bundle to get this now tested MSI app into ZENworks so that we can continue to make any last modifications to get it just right for deployment. Here are the steps within the ZCC:
On the left navigation pane, click Bundles.
Select New-->Bundle-->Windows Bundle-->MSI Application.
Define Details: Name your application bundle, select the folder for it’s final resting spot and assign it an icon. Oh, be sure to add a description in the text box like version numbers or anything else pertinent. We are browsing to ZOOM exe “C:\Program Files (x86)\Zoom\bin\Zoom.exe” to grab the proper icon of this app rather than assigning something generic. Let’s face it, we’re going for a cool user experience so don’t overlook little things like this!
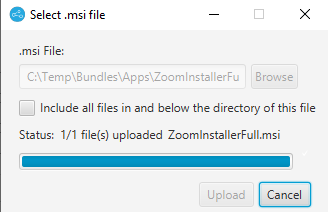
Select Next. Here we will utilize the ZEN content repo where we’ll upload the MSI to the system and let it ingest all of that MSI app goodness! Alternatively, you have an option on this screen to point the bundle to an MSI out on a network share via UNC path.
OK, get that puppy uploaded, setup your MSI parameters (passive mode), make any other MSI properties changes as required and continue through the phases of the bundle wizard.


Finish off by ensuring the bundle is in sandbox mode and “define additional properties” is ticked.

Ready-Set-Action(s)!
Great job for hanging in there, we’re almost done! We now have our bundle created and now we want to give it some requirements and specific actions as it’s being deployed. Remember, ZENworks is very flexible especially at choosing exactly what you want to happen at the time of deployment and there is a plethora of built-in options to help you along the way.
Case in point, in our deployment, we only want to deploy this version of ZOOM on systems that either don’t have it or have older versions. In the image below, you’ll notice that I’m assigning a requirement in order for the installer to run. In my case and at the time of this writing, the version we’re going with is “5.1.28546”. However, how awesome and flexible are all the other choices within the UI drop-down!? The ZENworks PM’s & devs are always on point with packing-in many useful features and real-world options.

A few more things here, notice that I’ve changed the Action Name to what the action actually does “Install ZOOM MSI Installer”. You’ll also notice the requirement value states, if the “zoom.exe” in path in “C:\Program Files (x86)\Zoom\bin\” is not equal to or "<>" version 5.1.28546, then the installer will run!

Next, we are going to make a setting change to the app so that it won’t check the ZOOM mothership for updates – we’ll let the you guys handle that thank you very much! We can accomplish this by creating an additional action to change a registry value. In our case, we will set “DisableUpdate=True”
[HKEY_LOCAL_MACHINE\SOFTWARE\WOW6432Node\Zoom\MSI]
"DisableUpdate"="true"
We’ve previously exported the registry edits to a reg file on our system then just simply created a new “Registry Edit” action set then imported the reg file – check it out below, easy as can be!

Below is a view of both the Install and Launch from our action sets respectively. The actions are named appropriately and the bundle is ready for sandbox testing. Go ahead and add your device or user assignment under Relationships and fire away!
Install Actions:

Launch Actions:

Closing time
This blog tutorial overview was not meant to be an exact guideline as to what you’ll need to do but it will certainly get you started! The best thing is that the ZENworks features are very flexible and offer a bunch of options from keeping deployments simple to highly customizing action-sets in a very logical manner.
For more info reach out to the good folks at Micro Focus/OpenText for your 60-day evaluation or let us know how we can help answer any ZENworks related questions or even get you setup on your evaluation (remotely of course)!
Contact the CISteksTG team to find out more

Follow us on:


Comments